Stop wiring everything into the cabinet.
In a classic setup, every sensor wire starts on the machine and ends up in the control cabinet. One sensor, one cable, all the way back. Multiply that by 50 or 200 sensors, and you get hours of wiring, kilos of copper, and one very unhappy person doing the troubleshooting. The Advantech ADAM-250PN flips that around. It’s a rugged IP-rated remote I/O module that you mount directly on the machine, and you run one network cable back instead.Even better: it speaks PROFINET and Modbus TCP at the same time, so your Siemens PLC controls the I/O while an edge device reads the same I/O for the cloud, with no gateway in between.
The Full Video
Why Classic Modular PLC I/O Holds You Back
Let’s be fair: modular PLC I/O has served us well for decades. But it comes with four limitations that don’t fit how modern factories want to work.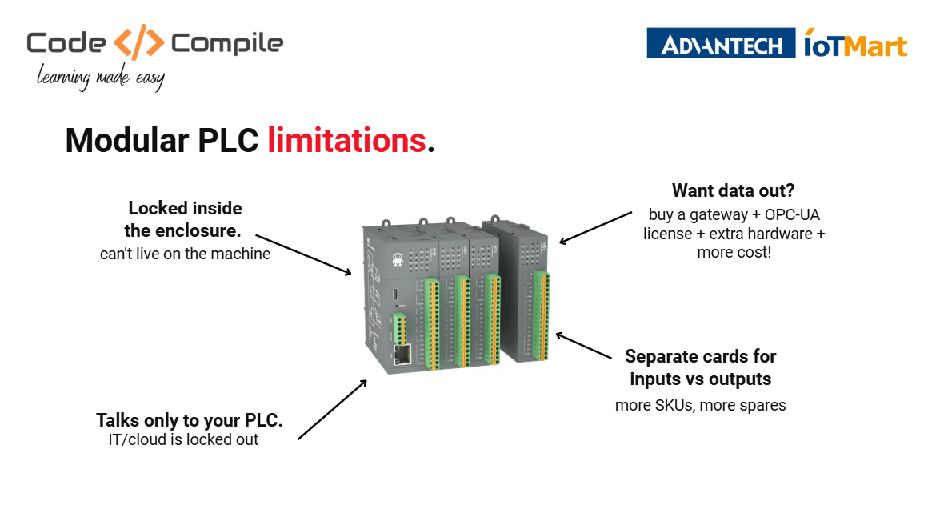
- Locked inside the enclosure. The cards need a cabinet, a DIN rail and protection from the environment. They can’t live on the machine.
- Separate cards for inputs and outputs. Need two more outputs? Buy another card. More part numbers, more spares on the shelf.
- Talks only to your PLC. Your IT team, your dashboard, your cloud are locked out.
- The expensive one. Want the data out anyway? Now you’re buying a gateway, an OPC UA license, extra hardware and somebody’s time to set it up.
The New Approach: I/O on the Machine
Instead of every sensor wire running back to the cabinet, you mount a remote I/O unit directly on the machine, for example, one module per conveyor section. Power (24 VDC) and PROFINET are daisy-chained from module to module, and only one cable goes back to the PLC. Adding another conveyor? Bolt on another module and plug it into the chain.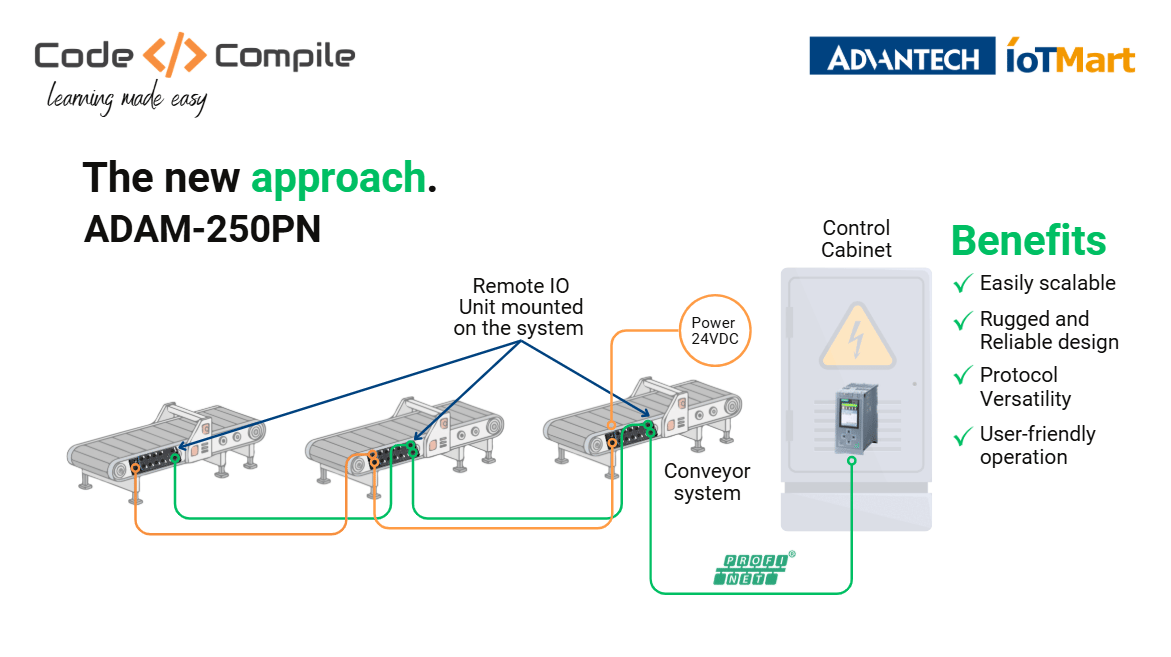
What you gain:
- Easily scalable: add a module, extend the chain
- Rugged and reliable: built to sit on the machine, not in a cabinet
- Protocol versatility: PROFINET and Modbus TCP/IP on the same module
- User-friendly operation: M12 plug-and-play wiring, configuration in software
The Hardware
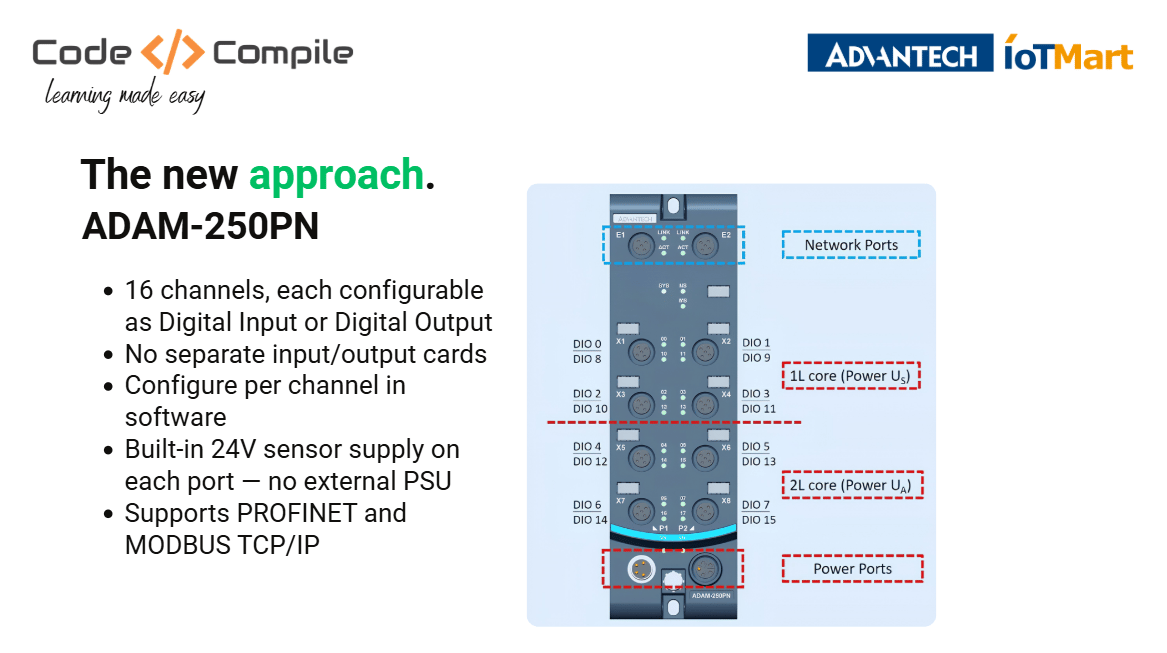
- 2 network ports (E1/E2) on top for PROFINET or Modbus TCP, so you can daisy-chain modules.
- 8 M12 ports (X1–X8), each carrying two channels: 16 channels in total.
- Every channel can be a digital input OR a digital output. You decide per channel in software. No separate input and output cards: one part number covers 16 DI, 8 DI + 8 DO, 10 DI + 6 DO, whatever your machine needs.
- Built-in 24 V sensor supply on every port: sensors are powered straight from the M12 cable, no extra PSU in the field.
- Two power groups: ports X1–X4 run on sensor power (Us, 1L core), ports X5–X8 on actuator power (Ua, 2L core) for higher loads.
- 2 power ports at the bottom.
| Port | Channels | Power group |
|---|---|---|
| X1 | DIO 0 / DIO 8 | Us |
| X2 | DIO 1 / DIO 9 | Us |
| X3 | DIO 2 / DIO 10 | Us |
| X4 | DIO 3 / DIO 11 | Us |
| X5 | DIO 4 / DIO 12 | Ua |
| X6 | DIO 5 / DIO 13 | Ua |
| X7 | DIO 6 / DIO 14 | Ua |
| X8 | DIO 7 / DIO 15 | Ua |
Wiring the I/Os
Wiring an input (Sink / NPN)
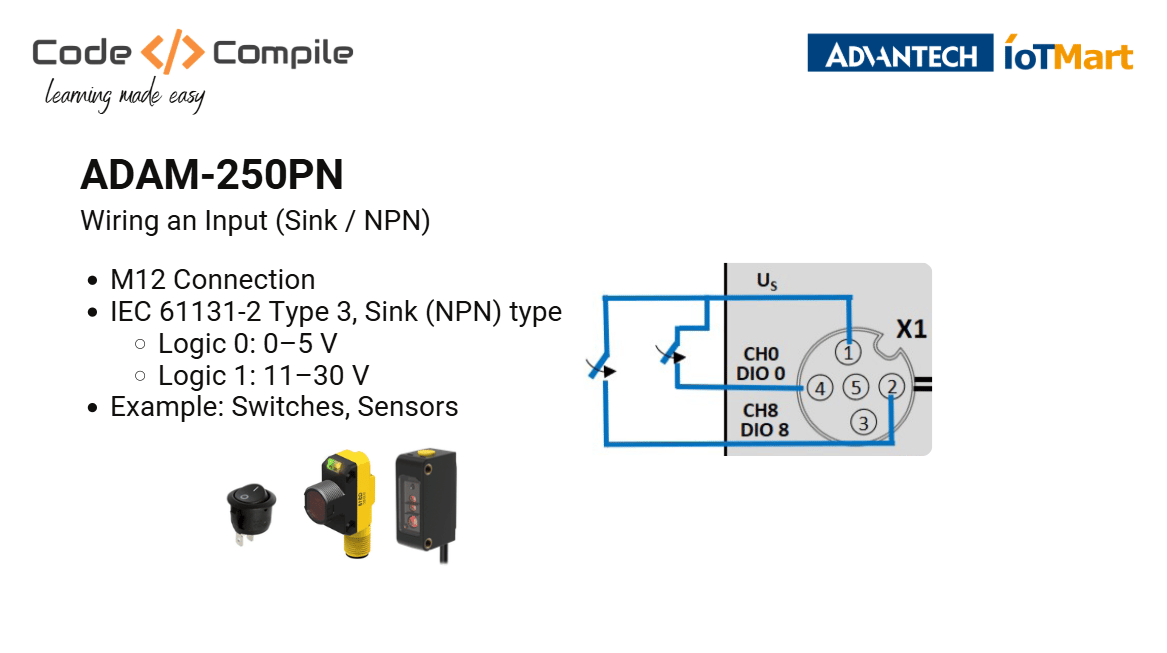
- M12 connection: most sensors today ship with an M12 connector, so you plug them straight in.
- IEC 61131-2 Type 3, sink (NPN) type inputs:
- Logic 0: 0–5 V
- Logic 1: 11–30 V
- On X1: pin 1 = Us (+24 V), pin 4 = CH0 (DIO 0), pin 2 = CH8 (DIO 8). One M12 cable can bring in two signals.
- Examples: switches, photoelectric sensors.
Wiring an output (Source type)
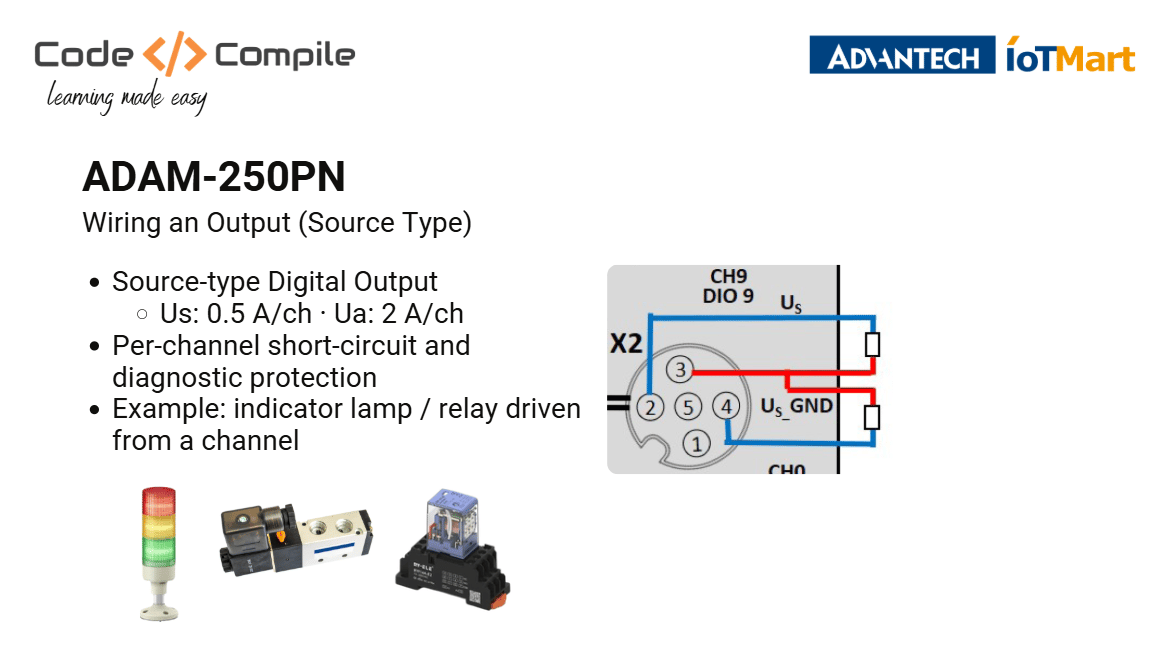
- Source-type digital outputs: the module provides the 24 V to the load.
- Us group: 0.5 A per channel
- Ua group: 2 A per channel (solenoid valves, relays)
- On X2: pin 4 = DIO 1, pin 2 = DIO 9, pin 3 = Us GND (common to both outputs).
- Per-channel short-circuit and diagnostic protection: a shorted load costs you one channel, not the whole module.
- Examples: indicator lamps, tower lights, valves, relays.
Built-in Diagnostics
The module tells you which channel failed and how, via LEDs and the network, so your PLC or dashboard can react.- Digital inputs: wire-break detection
- Digital outputs: over-current, short to ground / short to power
- Power: over-voltage, under-voltage, over-current
Ch2: Wire-Break Fault).
The Live Demo Architecture
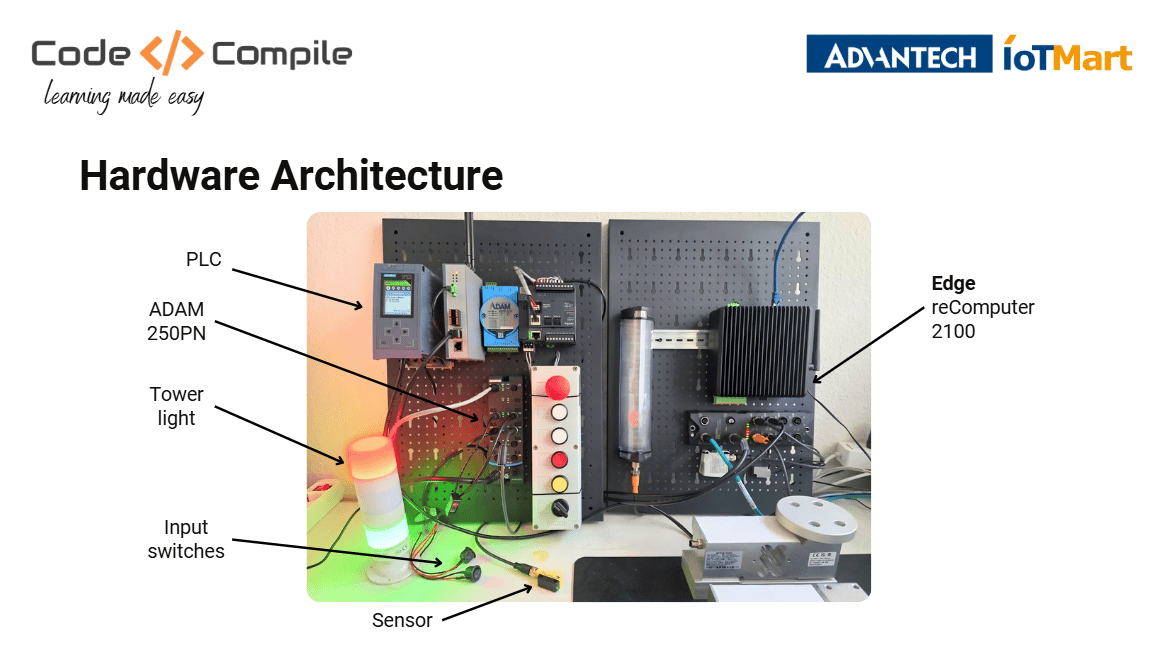
The core idea of the demo: the PLC controls, the edge reads.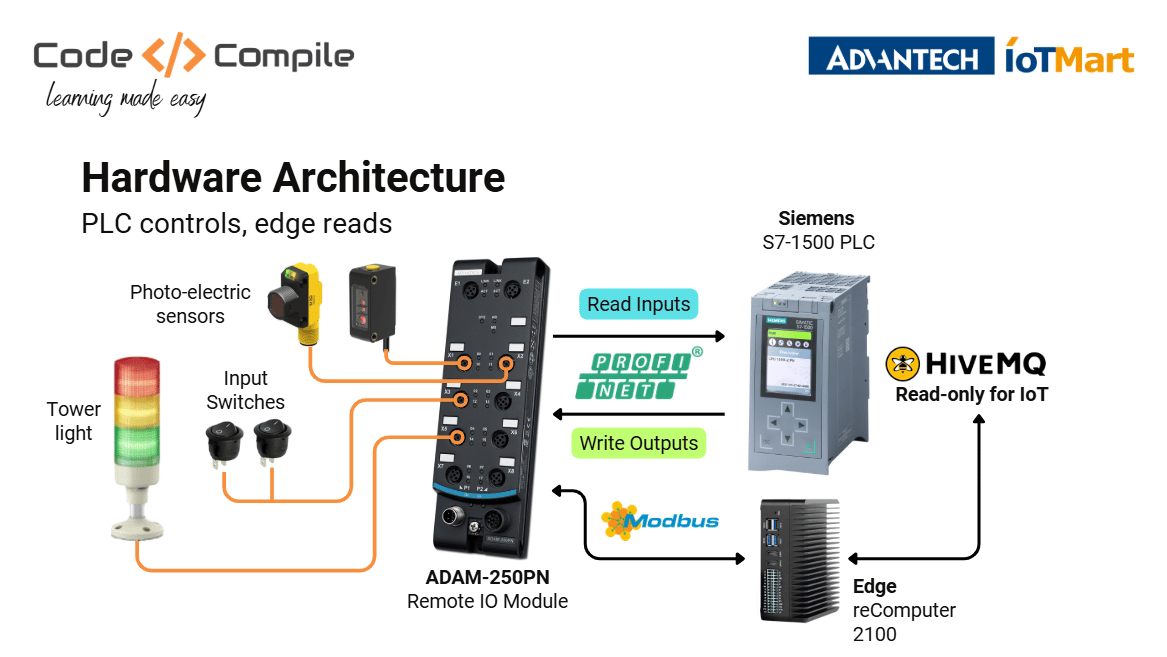
Photoelectric sensors + input switches + tower light → ADAM-250PN → PROFINET → Siemens S7-1500 (CPU 1516) reads inputs and writes outputsIn parallel: ADAM-250PN → Modbus TCP (read-only) → reComputer 2100 edge device (Node-RED) → MQTT → HiveMQ Cloud
Demo 1: PROFINET Setup in TIA Portal
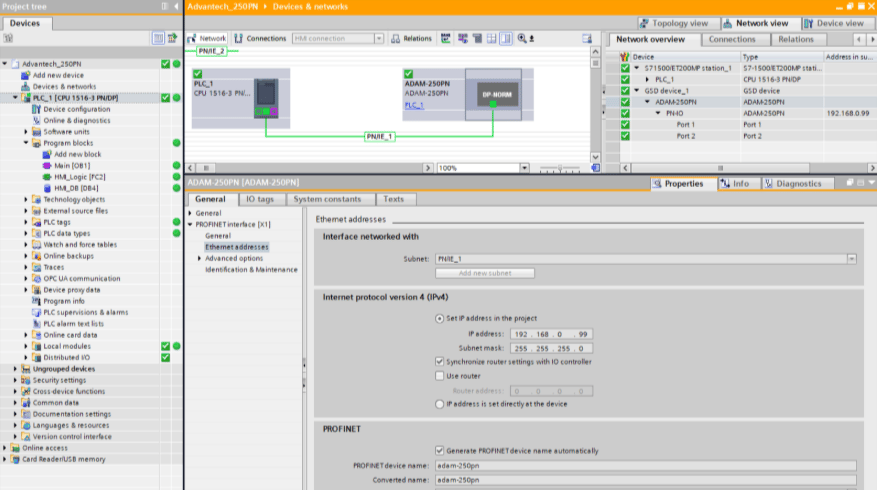
- Download the GSDML file for the ADAM-250PN from the Advantech product page (Technical downloads). The latest firmware is there too.
- In TIA Portal: Options → Manage general station description files (GSD) → install the GSDML.
- In the hardware catalog, search for ADAM, then drag the ADAM-250PN into the network view.
- Assign it to the PLC: click Not assigned → PLC_1.PROFINET interface_1.
- Set the IP address in the device properties, and check the PROFINET device name. It must match the name on the device; otherwise, the PLC can’t connect.
- Open the device view → 16DIO module → General parameters and set the operating mode of each channel (DI or DO). Here you can also enable diagnostics and input delays.
- Write your PLC tags and a small program, download, and go online.
In the demo, channels 0–3 and 8–11 are inputs, channels 4–7 and 12–15 are outputs: 8 DI + 8 DO from one module.
I/O addressing explained
The module occupies 2 input bytes and 2 output bytes (address 0–1). Channels 0–7 map to byte 0, channels 8–15 to byte 1:
Demo tags as an example:
An input channel still “occupies” its bit in the output byte and vice versa. Always count by channel number, not by “the n-th input”.
The demo logic: Sensor 0 AND Sensor 1 → green indicator, Switch 1 AND Switch 2 → red indicator. Two networks, no rocket science.
Demo 2: Modbus TCP + Node-RED Dashboard
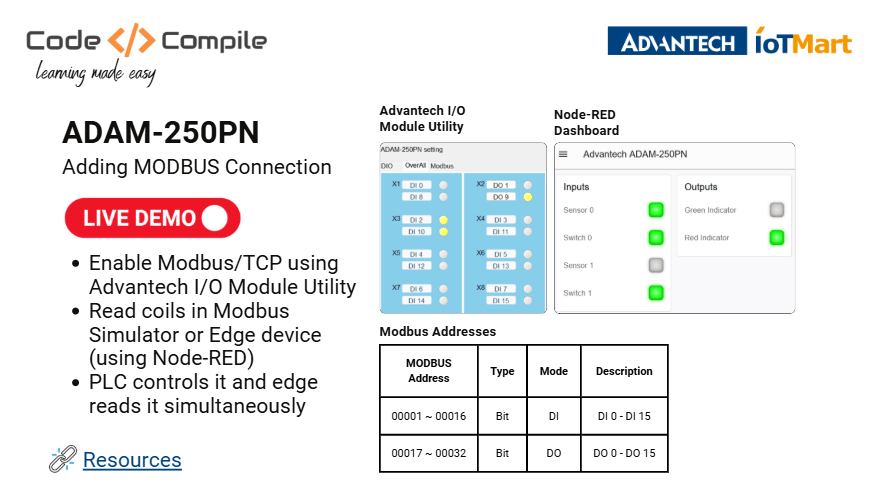
- In the Advantech I/O Module Utility, check the Modbus tab. PROFINET and Modbus are both enabled by default. You can disable either if you like.
- Read the coils in a Modbus simulator, or from your edge device with Node-RED.
- In Node-RED, use a Modbus Read node: module IP, port 502, coil status, address 0, quantity 32.
- Split the result with a small function node: coils 0–15 are inputs, 16–31 are outputs, and drive the dashboard LEDs.
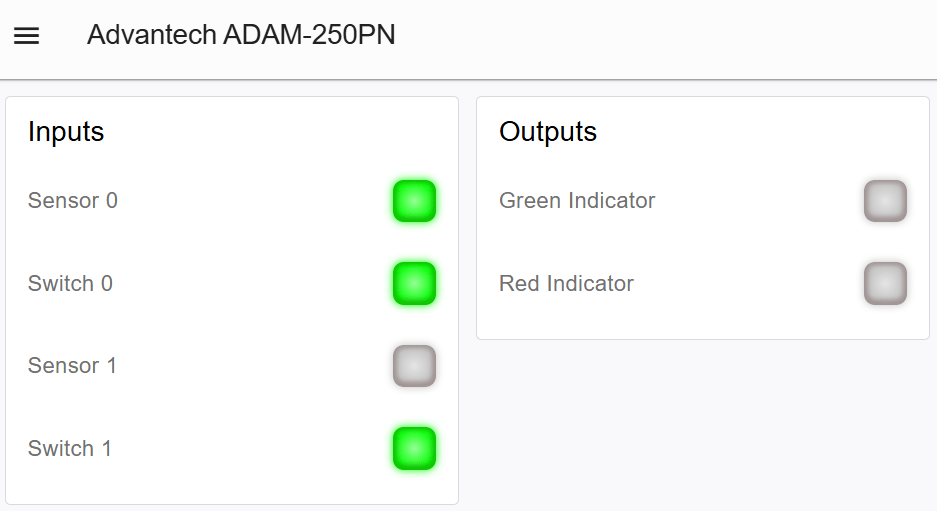
The result: flip a switch on the bench and in TIA Portal, the utility and the Node-RED dashboard all update at the same moment. One module, two masters, no gateway.
Demo 3: Node-RED → MQTT (Cloud)
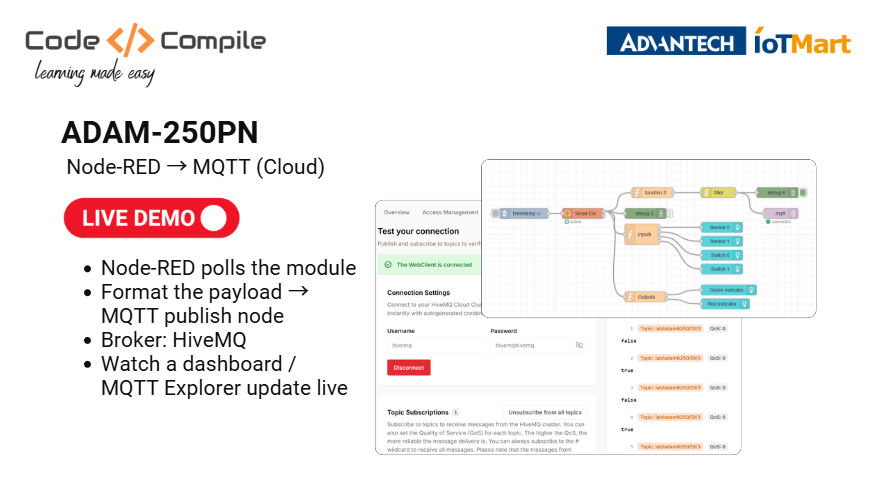
- Node-RED polls the module (Modbus Read, see above).
- A filter node (report by exception) only passes values that changed, so you don’t spam the broker.
- A function node formats the payload and sets one topic per signal, e.g.
lab/adam250pn/DI/0. - An MQTT out node publishes to HiveMQ Cloud (broker URL, username, password).
- Open the HiveMQ web client or MQTT Explorer and watch
true/falsearrive live as you trigger a sensor.
Source Code & Resources
TIA Portal project (ADAM-250PN configuration + demo logic):Node-RED flow export (Modbus read → dashboard → MQTT publish):GSDML file, firmware, and manual: Advantech ADAM-250PN product page
Advantech_250PN_demo.zap18
Advantech 250-PN demo.json
- Modbus TCP port:
502 - Coils
0–15= DI 0–15, coils16–31= DO 0–15 (Node-RED uses 0-based addresses) - PLC: Siemens S7-1500, CPU 1516-3 PN/DP, TIA Portal
- Edge device: reComputer 2100 running Node-RED
- Broker: HiveMQ Cloud
Where Does This Make Sense?
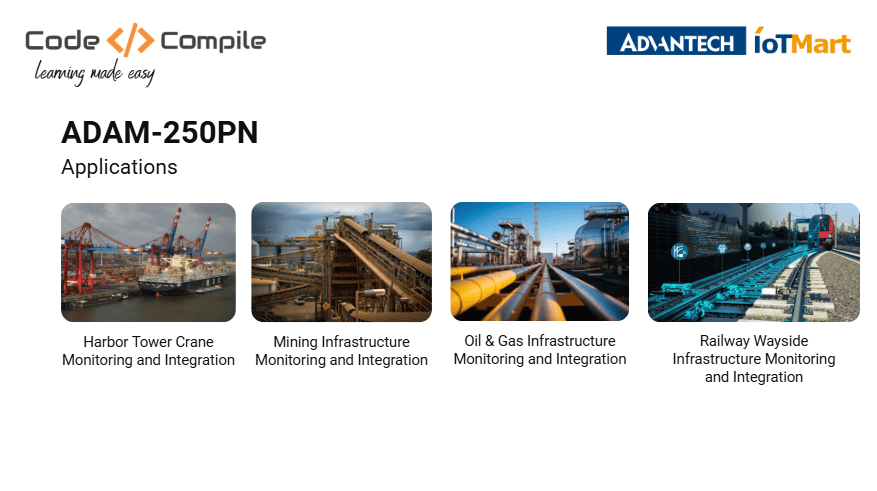
- Harbor tower cranes: the cabinet is 50 meters away from the sensors.
- Mining infrastructure: conveyors covered in dust and vibration.
- Oil & gas: pipelines spread across huge sites.
- Railway wayside equipment: out in the weather, far from any control room.
The Verdict
The ADAM-250PN does three things really well: it gets the I/O out of the cabinet and onto the machine, it gives you 16 channels that can be input or output, and it supports PROFINET for the PLC and Modbus TCP for the edge at the same time. Add diagnostics that tell you exactly what broke, and it’s a strong option for any distributed machine or IIoT retrofit.Where to Buy
The ADAM-250PN is available online at IoTMart, Advantech’s official marketplace:- Advantech IoT Mart
- Learn more: advantech.com/en-eu
This review was sponsored by Advantech and IoTMart. All opinions are my own.
Key notes:
Canva presentation
canva.link