

Introduction
Adding a full-proof security circuit in any industrial process is always a high priority and something which we cannot compromise. In old days, the security circuits are created using complicated relay logic which is hard to modify in case of any extra safety device needs to be included. Making the safety circuit difficult to bypass is another challenge with relay logic controls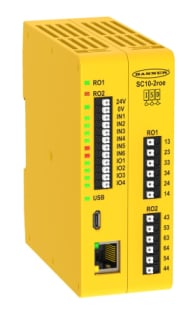
- Create cat 4 safety circuits using an icon-based programmable tool
- Read signals from safety and non-safety devices via PROFINET and MODBUS TCP/IP
- Plug and play of safety devices using ISD technology
Want to know more? Check the web series to learn how you can use the SC10 controller in your application
Episodes
1: Introduction to Safety Controller SC10
In this episode, you will learn about various safety devices which can be interfaced to the SC10 safety controller along with a brief introduction to the SC10 controller explaining its terminals and communication interfaceEpisode 1: Understanding SC10 Controller
- E-Stop with ISD
- RF switch with ISD
- Magnetic door switch
- Manual reset button (Non-safety input)
2: Interfacing SC10 controller with PC
In this episode, you will see how easy it is to interface the SC10 controller with the PC using a USB cable. Banner provides a free icon-based programming tool that is used to program the controller. The user can go to LIVE mode to see the real-time behavior of the SC10 controllerEpisode 2: Interfacing SC10 controller with PC
The software programming tool can be downloaded and used for free. It offers offline simulation. It would be amazing to download and use it as an offline tool to practice the logics which are coming in the next videos
3: Programming SC10 controller
In this episode, you will see a programming example where a magnetic door switch is used to control the safety relay output of the SC10 controller.Episode 3: Programming SC10 controller
4: RF door switch safety circuit
Safety door switches with a limit switch or magnetic action are easy to hack. But you cannot easily hack a safety switch that is uniquely coded with RFID. Check out this episode to see this next-level safety switch in action. The RF safety switch is used to control the relay output of the SC10 controllerEpisode 4: RF door switch safety circuit
5: E-Stop safety circuit
Using conventional E-Stop is not highly intuitive when we are dealing with multiple e-Stop in a single process. Banner introduced E-Stop with built-in LED light which illuminates when the E-Stop is inactive and red when E-Stop is active. Not only that, several E-Stop can be connected in series using ISD which saves time and easy to control, program, and monitorEpisode 5: E-Stop safety circuit
6: E-Stop safety circuit with ext. Reset
So far, you have seen safety circuits that are not cat 4 types because there is no external reset switch involved. In this episode, you will see how you can latch the safety circuit using the LR block. This block can be used and programmed in the SC10 controller. Furthermore, you will see how an intuitive LED button can be used to reset the safety circuitEpisode 6: E-Stop safety circuit with ext. Reset
7: Indicating fault on Manual reset button
Showing alarms and warnings is one thing, but using the SC10 controller you can also show if the safety device is in a fault state or marginally fault state. This will help to predict future failures in advance. In this episode, you will see how a fault in the safety device can be indicated on the manual reset switch using a red LEDEpisode 7: Indicating fault on Manual reset button
8: Interfacing S7-1200 PLC with SC10
A PLC is the most widely used device in any industrial application. Very unlikely you will find an industrial process without a PLC SC10 controller is capable of interacting with PLC via MODBUS TCP/IP, Ethernet IP, or PROFINET. In this episode, you will see how the SC10 controller interacts with S7-1200 PLC via PROFINETEpisode 10: Interfacing S7-1200 PLC with SC10 Controller
9: Reading virtual Non-safety inputs via PROFINET
Sometimes we do not have a safety device to trigger a safety circuit but instead some parameters (flow level, speed, temperature, etc.) whose critical value should trigger the safety circuit. To interact with these PLC parameters with the SC10 safety controller we transmit the parameter via PROFINET to the SC10 controller as non-safety input Want to see how? Check out this episode to learn moreEpisode 9: Reading virtual Non-safety inputs via PROFINET
10: Bypassing the Magnetic switch via PROFINET
Under certain circumstances, it is necessary to bypass the safety device. This is required while maintenance of the machine. To bypass the sensor, one can use the HMI or any external switch. In this episode, you will see how magnetic safety input can be bypassed using an external toggle switch. The signal is transmitted to the SC10 controller via PROFINET from S7-1200 PLCEpisode 10: Bypassing the Magnetic switch via PROFINET
11: Monitoring safety signals on Node-RED Dashboard
It is always amazing to monitor the safety signal in the remote control room. In this episode, you will see how you can monitor the status of safety input, non-safety input, controller status, and safety relay outputs on the Node-RED dashboard This has been made possible by interfacing Node-RED with the SC10 controller via MODBUS TCP/IPEpisode 11: Monitoring safety signals on Node-RED Dashboard
I hope you liked this web series on safety controllers. If you like to watch more of such web series, then subscribe to my channel
Related
Software downloads
Download links for the PLC, HMI and IIoT software used in the courses.
Books and guides
Manuals and reference guides for the hardware.